How to install Frosted Films
(Standard instructions v2.7)

Preparations
Firstly, clean your glass with a lint free cloth and glass cleaner and make sure the edges of the window frame are free from any loose paint or fibres.
You'll need to prepare a large flat work surface, such as a kitchen table. It needs to be completely clear, clean and free from dust, pet hairs, etc.
Things you will need:
Plant sprayer type bottle. (For the application fluid)
Old credit card (To use as a squeegee)
Pin (If your frosted film has a design)
An assistant to help you
Step 1: Make up your application fluid
First, make the application fluid by filling a spray bottle with water and a few drops of washing up liquid. Tip: Add just enough washing up liquid to make the solution feel slightly slippery to the touch.
Step 2: Lay-out your frosted film
Give your hands a quick wash, and lay the window film onto the table, frosted side down, white backing side up. If your film has design cut-outs then they will be covered with a protective masking tape - Do not remove this tape yet!
Establish which are the top two corners of the window film. Wet your hands with the detergent solution so that you'll be able to touch the film and not leave finger prints.
Step 3: Peeling off the white backing from one corner
Now you are ready to peel off the white backing. Begin by peeling one of the top two corners - you will start to see the sticky side of the film.
Spray this newly revealed 'sticky' corner with the detergent solution.
Hold the corner of the frosted film flat on the table and ask your assistant to peel back one corner of the backing paper.
Step 4: Continue to peel off the white backing

Continue to spray the sticky side of the film as, it’s revealed. Be carful not to spray the back of the release liner, as this may cause it to saturate and potentially delaminate.
Once your assistant has peeled back one corner as far they can, they can start to peel the backing sheet evenly by holding both corners. Wet both of your hands and place them on the frosted film so you can hold it in place, while your assistant peels the liner.
Step 5: Prepare your windows
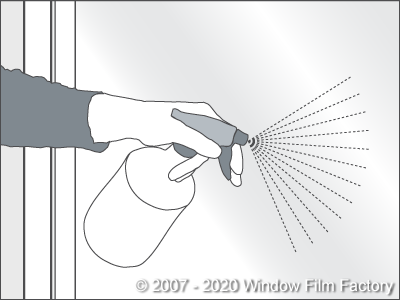
Liberally spray your application fluid, on the glass area to be frosted.
Tip: spray the window frames, to help prevent the frosted film from accidently sticking to them.
Step 6: Apply the frosted film

Lift the window film by the top two corners and with the sticky side facing the window, place the film onto the glass. The detergent solution will then enable you to slide the film perfectly into position.
Step 7: Remove liquid solution and bubbles
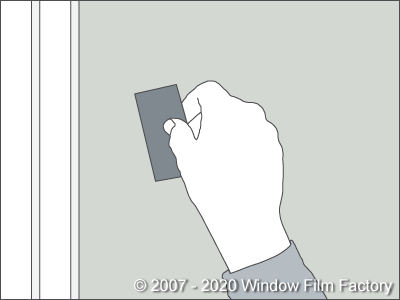
Using the squeegee; carefully smooth over the film from the centre outwards . This will remove excess solution and allow the film to make full contact with the glass. If the film moves out of position, just place your hands flat on the film and gently slide it back again.
If possible, have a look at the film from the other side as this may help to reveal air bubbles you have missed. Don't worry if the film looks slightly streaky at this point, the streaks disappear as it dries. The film is dry and fixed within approximately 24 hours.
Step 8: Remove tape covering design cut-outs (if you have any)

The following additional stages apply if you have a design cut into your film.
In order to keep the design in place; there is a layer of protective tape covering the design cut-outs Leave the film for 6 hours, so that it has semi-dried. (or preferably overnight)
Next; wet the tape, using the spray bottle. The tape should begin to saturate after a few minutes of wetting.
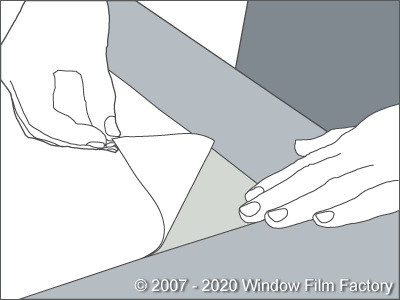
Now carefully peel off the protective tape covering the cut-out shapes.
Step 9: Pick out the design cut-outs

Finally; pick out the shapes using a pin to get you started. If any parts of the film lift too easily, then allow the film to dry some more.
It’s best to peel off the unwanted film within 24 hours or it may be more difficult to peel off!
Frosted film will slowly dry out and fully adhere over several days. During this time, you may notice some haziness - which will clear.